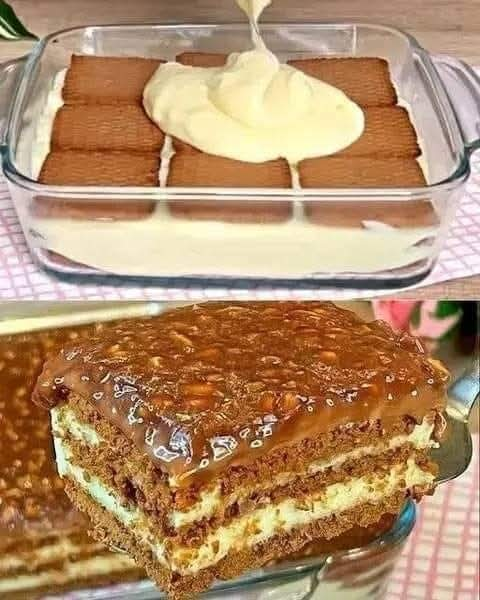
Based on the images provided, this is a classic No-Bake Chocolate Biscuit Cake (often known as “Marie Biscuit Cake,” “Chocolate Fridge Cake,” or “Bolo de Bolacha”). It is a beloved dessert in many cultures because it requires no oven and uses simple, accessible ingredients.
Here is the complete, detailed recipe and guide.
Introduction
This dessert is the ultimate comfort food. It transforms humble tea biscuits (like Marie or Graham crackers) and simple cream into a decadent, sliceable cake. The magic happens in the refrigerator, where the biscuits soften and fuse with the cream, creating a texture similar to tiramisu but with a rich, chocolatey finish. It is the perfect recipe for beginners, busy parents, or anyone who wants a delicious dessert without turning on the oven.
Ingredients
For the Cream Filling:
· Heavy Whipping Cream: 2 cups (500ml), very cold.
· Powdered Sugar: ½ cup (60g), or to taste.
· Vanilla Extract: 1 teaspoon.
· Mascarpone or Cream Cheese (Optional): ½ cup (100g) for extra stability and tang (you can use all cream if preferred).
· Coffee or Milk: 1 cup (for dipping the biscuits). Optional: Add 1 tbsp instant coffee to the milk for a mocha flavor.
For the Assembly:
· Tea Biscuits (Marie, Graham, or Petit Beurre): Approximately 30–40 biscuits (enough to make 4 layers).
· Milk: For quick dipping (to soften the biscuits).
For the Chocolate Topping:
· Dark or Milk Chocolate: 200g (7 oz), chopped.
· Butter or Coconut Oil: 2 tablespoons (to make the chocolate glossy and easy to cut).
· Heavy Cream: ¼ cup (optional, for a ganache texture).
Instructions (Method)
1. Prepare the Cream:
· In a large chilled bowl, whip the heavy cream until soft peaks form.
· Add the powdered sugar and vanilla extract. Continue whipping until stiff peaks form.
· If using mascarpone or cream cheese, gently fold it in now until smooth. Do not overmix.
2. Prepare the Dipping Station:
· Pour milk (or coffee) into a shallow bowl. Dip each biscuit quickly—just a 1-second dip on each side. Do not soak them, or they will fall apart.
3. Layering (The Formation):
· Base: Line a square glass dish (approx. 8×8 inches) with plastic wrap or parchment paper.
· Layer 1: Dip biscuits in milk and arrange them in a single layer at the bottom of the dish. Break biscuits to fill any gaps.
· Layer 2: Spread a generous layer of whipped cream over the biscuits.
· Repeat: Continue alternating layers of dipped biscuits and cream. You should aim for 4 layers of biscuits.
· Top: Finish with a smooth layer of cream on top.
4. Chill:
· Cover the dish and refrigerate for at least 4 to 6 hours (overnight is best). This allows the biscuits to soften and the cake to set.
5. Chocolate Topping:
· Melt the chocolate and butter (and cream if using) in a microwave-safe bowl in 30-second intervals, stirring until smooth.
· Pour the melted chocolate over the top of the chilled cake. Spread evenly with a spatula.
6. Final Set:
· Return to the fridge for 30 minutes until the chocolate hardens.
History
This cake has many names and variations globally:
· Portugal (Bolo de Bolacha): A national treasure made with Maria biscuits and coffee buttercream.
· UK (Chocolate Fridge Cake): Often uses golden syrup and crushed biscuits mixed in.
· Brazil (Bolo de Bolacha): Similar to the Portuguese version but often uses condensed milk.
· The Origin: It likely originated in the early 20th century when “Marie Biscuits” (plain, sweet biscuits named after the Duchess of Marie) became widely available. Housewives created this “icebox cake” as a way to use up stale biscuits and create a dessert without an oven, which was a luxury in many households.
Benefits
· No Baking Required: Perfect for hot days or if you don’t have an oven.
· Cost-Effective: Uses pantry staples (biscuits, cream, chocolate).
· Make-Ahead: It is actually better if made a day in advance.
· Customizable: You can add nuts, fruit, or different extracts (peppermint, orange).
Formation Tips (How to get the perfect slice)
· The Dip: As mentioned, dip the biscuits fast. If they get too soggy, they will turn to mush.
· Even Layers: Use a straight-edged spatula to press down slightly on each layer to ensure there are no air pockets.
· The Cut: To get clean slices like the photo, use a hot knife. Run the knife under hot water, wipe it dry, and slice. Wipe the knife clean between cuts.
Benefits for Lovers (Why couples and families love it)
· Romance: Chocolate and cream are classic aphrodisiacs. The rich texture is indulgent and perfect for sharing.
· Activity: It’s a fun dessert to make with kids or a partner because there is no risk of burning anything in the oven.
· Presentation: The glossy chocolate top looks impressive, making it a great “showstopper” for a romantic dinner or family gathering.
Nutrition (Approximate per serving)
· Calories: 350–450 kcal (depending on the cream and chocolate used).
· Fat: High (from cream and chocolate).
· Carbohydrates: Moderate to High (from biscuits and sugar).
· Protein: Low to Moderate (from dairy).
· Note: This is a treat, not a diet food. It is rich in calcium but high in saturated fat.
Conclusion
The No-Bake Chocolate Biscuit Cake is a testament to the fact that the best desserts don’t always require complex techniques. It is a nostalgic, rich, and satisfying dessert that pleases everyone. Whether you call it a fridge cake, a biscuit cake, or a no-bake cake, the result is the same: a slice of pure joy.
Variations
· Fruit Lover: Add a layer of sliced bananas or strawberries between the biscuits.
· Nutty: Fold chopped walnuts or hazelnuts into the cream.
· Boozy: Add a splash of rum or Baileys to the milk dipping bowl.