Cherry Cheesecake Don’t LOSE This Recipe!
Introduction
Cherry Cheesecake is a beloved dessert that perfectly combines a buttery graham cracker crust, a smooth and creamy cheesecake filling, and a sweet cherry topping. Elegant enough for celebrations yet simple enough for family dinners, this classic treat never fails to impress.
Origin
Cheesecake dates back thousands of years to ancient Greece, where early versions were served during festivities and athletic events. The modern cheesecake we know today evolved in the United States with the introduction of cream cheese in the late 1800s. The addition of cherry topping became a popular variation, adding vibrant color and a delightful balance of sweetness and tartness.
Cultural Significance
Cheesecake has become a staple dessert at holidays, birthdays, weddings, and family gatherings across many cultures. Cherry Cheesecake, in particular, is cherished for its eye-catching appearance and luxurious flavor, making it a favorite centerpiece for special occasions.
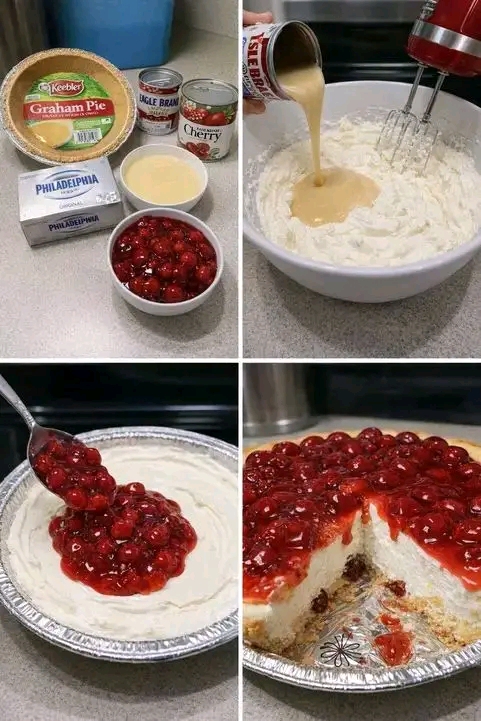
Ingredients Quantity
For the Crust
– 1½ cups graham cracker crumbs
– ⅓ cup unsalted butter, melted
– 2 tablespoons granulated sugar
For the Filling
– 16 oz (450 g) cream cheese, softened
– ¾ cup granulated sugar
– 2 large eggs
– 1 teaspoon vanilla extract
– ½ cup sour cream
For the Topping
– 1 can (21 oz / 595 g) cherry pie filling
Optional Additions
– Fresh cherries for garnish
– Whipped cream
– Lemon zest
– Almond extract
– White chocolate curls
– Crushed pecans or almonds
– Chocolate drizzle
Tips for Success
– Bring cream cheese to room temperature before mixing.
– Beat ingredients just until smooth to avoid incorporating excess air.
– Bake the cheesecake slowly for a silky texture.
– Allow it to cool gradually to help prevent cracks.
– Refrigerate for several hours or overnight before serving.
– Use a warm knife for neat slices.
Instructions
Step 1: Prepare the Crust
1. Preheat the oven to 325°F (165°C).
2. Mix the graham cracker crumbs, melted butter, and sugar in a bowl.
3. Press firmly into the bottom of a 9-inch (23 cm) springform pan.
4. Bake for 8–10 minutes, then allow to cool.
Step 2: Prepare the Filling
1. Beat the softened cream cheese until smooth.
2. Add the sugar and continue mixing.
3. Incorporate the eggs one at a time.
4. Stir in the vanilla extract and sour cream until fully combined.
5. Pour the filling over the cooled crust.
Step 3: Bake the Cheesecake
1. Bake for 45–55 minutes, or until the center is nearly set.
2. Turn off the oven and leave the cheesecake inside with the door slightly open for 1 hour.
3. Remove and cool completely at room temperature.
Step 4: Chill and Decorate
1. Refrigerate for at least 4 hours, preferably overnight.
2. Spread the cherry pie filling evenly over the top before serving.
Description
This Cherry Cheesecake features a crisp, buttery crust topped with a velvety cream cheese filling and a glossy layer of sweet cherries. Each bite offers a delightful contrast of textures and flavors, from the crunchy base to the creamy center and fruity topping.
Nutritional Information
Approximate values per serving (based on 12 servings):
– Calories: 380
– Protein: 6 g
– Carbohydrates: 34 g
– Fat: 25 g
– Saturated Fat: 14 g
– Sugar: 26 g
– Sodium: 240 mg
– Fiber: 1 g
Conclusion
Cherry Cheesecake remains one of the most cherished desserts because it effortlessly combines elegance, flavor, and comfort. Its creamy texture and vibrant cherry topping make it a dessert that guests remember long after the last slice is gone.
Recommendation
Serve chilled with freshly brewed coffee, tea, or a glass of milk. For an extra-special presentation, garnish each slice with whipped cream and a few fresh cherries.
Embracing Healthful Indulgence
Enjoying homemade desserts can be part of a balanced lifestyle when consumed mindfully. Preparing Cherry Cheesecake from scratch allows you to control ingredient quality while creating a memorable treat to share with family and friends. Savor each bite, celebrate special moments, and enjoy this timeless dessert in moderation.