Homemade Pizza Dough Recipe 😍
Introduction
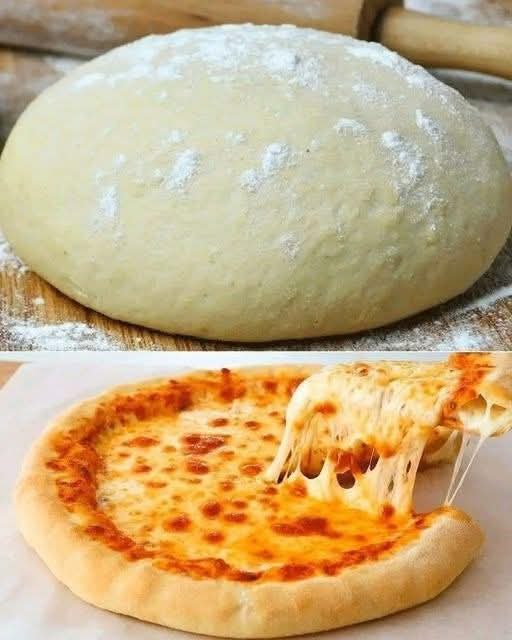
There’s something magical about making pizza dough from scratch. The aroma of yeast activating, the silky feel of dough under your palms, and the satisfaction of pulling a golden, bubbly crust from your own oven—it’s a ritual that connects you to generations of bakers. This recipe yields a classic, versatile dough: crisp on the outside, chewy on the inside, and ready to carry your favorite toppings. Whether you’re a weekend warrior or a weeknight cook, this dough will elevate your pizza night.
Ingredients
Ingredient Quantity Notes
Active dry yeast 2 ¼ teaspoons (1 packet) Ensure it’s fresh; check expiry date
Sugar 1 teaspoon Feeds the yeast and helps activation
Warm water 1 cup (240 ml) About 105–115°F (40–46°C)
All-purpose flour 2 ½ cups (315 g) Bread flour works too for more chew
Olive oil 2 tablespoons Extra virgin adds flavor
Salt 1 teaspoon Balances taste and strengthens gluten
Instructions
1. Activate the yeast – In a small bowl, combine warm water, sugar, and yeast. Stir gently and let sit for 5–10 minutes until foamy and fragrant. If no foam appears, your yeast may be dead—start over.
2. Mix dry ingredients – In a large mixing bowl, whisk together flour and salt.
3. Combine – Make a well in the center of the flour. Pour in the yeast mixture and olive oil. Stir with a wooden spoon or dough whisk until a shaggy dough forms.
4. Knead – Turn dough onto a lightly floured surface. Knead for 8–10 minutes until smooth, elastic, and slightly tacky (not sticky). Add flour 1 teaspoon at a time if needed.
5. First rise – Shape dough into a ball. Lightly oil a clean bowl, place dough inside, turn to coat. Cover with a damp towel or plastic wrap. Let rise in a warm, draft-free spot for 1–2 hours, until doubled in size.
6. Punch down – Gently deflate the dough and turn it out onto a floured surface.
7. Shape – Divide into 2 balls for two 10–12 inch pizzas, or keep as one for a thicker crust. For a single large pizza, leave whole.
8. Second rise (optional but recommended) – Cover dough balls with a towel and rest for 15–30 minutes. This relaxes gluten, making rolling easier.
9. Roll or stretch – Use your hands or a rolling pin to shape into your desired pizza round.
10. Bake – Top as desired and bake at 475–500°F (245–260°C) on a preheated pizza stone or steel for 10–12 minutes, or until crust is golden and toppings are bubbly.
Methods (Two Approaches)
Method 1: Hand-Kneaded Traditional
This classic method builds arm strength and intuition. After mixing, knead by pushing the dough away with your palm, folding it back, and rotating 90 degrees each time. You’ll feel the dough transform from sticky to silky. It takes practice but yields a deeply satisfying result.
Method 2: No-Knead & Stand Mixer
· Stand mixer: Use a dough hook on low speed for 5–7 minutes after mixing.
· No-knead: Mix ingredients until combined, cover, and let rest for 8–12 hours in the fridge. The long fermentation develops gluten naturally. Then shape and bake. Ideal for busy cooks.
History of Pizza Dough
Pizza’s roots stretch back to ancient civilizations. The Greeks baked flatbreads called plakous, topped with oils and herbs. But the true ancestor of pizza dough appeared in Naples, Italy, in the 18th century. Poor Neapolitans used leftover bread dough, topped it with tomatoes (brought from the Americas), garlic, and lard. By 1830, the first dedicated pizza shop—Port’Alba—opened, cooking dough in wood-fired ovens.
The Margherita pizza was born in 1889 when chef Raffaele Esposito made a dough topped with tomatoes, mozzarella, and basil to honor Queen Margherita of Savoy. That dough—simple flour, water, yeast, salt, and oil—has remained virtually unchanged for over a century. Today, Neapolitan pizza dough is protected by the Associazione Verace Pizza Napoletana, which mandates specific flour, kneading, and a 60–90 second bake in a 900°F oven.
Benefits of Homemade Pizza Dough
1. No preservatives – Store-bought dough often contains calcium propionate, L-cysteine, and other additives. Your dough has just five real ingredients.
2. Control over texture – Prefer a cracker-thin crust or a pillowy, thick one? You decide how long to knead and rise.
3. Lower sodium and fat – Commercial dough can hide extra salt and oil. You measure exactly what goes in.
4. Mental wellness – Kneading dough is meditative. The rhythmic motion reduces stress and releases tension.
5. Customizable nutrition – Swap ½ cup of whole wheat flour for extra fiber. Add herbs or garlic directly into the dough.
6. Cost-effective – A homemade dough costs about $0.50–$1.00, compared to $3–$5 for pre-made.
7. No equipment required – You can make it with just your hands and a bowl.
Formation (The Science of Gluten)
When you mix flour and water, two proteins—glutenin and gliadin—bond to form gluten. This elastic network traps carbon dioxide released by the yeast, creating air bubbles that make the dough rise. Kneading aligns these protein strands, strengthening the gluten matrix. Salt tightens this network, while olive oil lubricates it, adding tenderness.
The yeast (a living fungus) consumes sugar and produces CO₂ and ethanol. Warmth accelerates this fermentation, producing flavor compounds like esters and alcohols. During baking, the heat kills the yeast, water evaporates into steam, and the gluten sets, giving you that crisp-chewy crust. The Maillard reaction browns the surface, creating toasty, nutty notes.
Nutrition (Per ¼ of this recipe, approx. one 10-inch crust)
Nutrient Amount
Calories 210 kcal
Protein 6 g
Carbohydrates 38 g
Fiber 1.5 g
Sugar 1 g
Fat 4 g (mostly unsaturated)
Sodium 290 mg
Iron 10% DV
B vitamins (thiamin, niacin) 8-10% DV
Note: Topping nutrition not included. Use whole wheat flour to double fiber and add minerals like magnesium and zinc.
Lovers of Pizza Dough
Who adores this humble mixture of flour and water? Almost everyone, in different forms:
· Home cooks love the pride of creating dough from scratch.
· Children delight in poking, flattening, and tossing dough balls (culinary sensory play!).
· Professional pizzaiolos treat dough with near-religious reverence, often naming their sourdough starters.
· Fitness enthusiasts appreciate a controlled carb source after workouts.
· College students on a budget keep a batch in the fridge for quick, cheap meals.
· Food historians celebrate its role in global culinary heritage.
· Gluten-free bakers experiment with alternative flours (rice, almond, tapioca) to recreate the texture.
· Romantics find pizza dough an ideal date-night activity—messy, fun, and delicious.
Even pet dogs (in small, plain pieces) and backyard chickens have been known to enjoy scraps of leftover dough—though never raw, as yeast can expand dangerously in their stomachs.
Conclusion
Homemade pizza dough is more than a recipe—it’s an invitation to slow down, play with your food, and create something nourishing from elemental ingredients. With just five pantry staples and a little patience, you can produce a crust that outshines any delivery box. The process teaches you about fermentation, texture, and the joy of handmade food. Whether you top it with classic Margherita, spicy pepperoni, or roasted vegetables, the foundation starts here, in your own hands.
A Second Note for Pizza Lovers Everywhere
For those who truly adore pizza—the late-night snackers, the Neapolitan purists, the Detroit-style square devotees, the kids who pick off toppings and just eat the crust—this dough is your blank canvas. Keep a batch in your fridge for up to 5 days; it only gets better as it ferments slowly. Freeze extra balls for instant pizza nights. Share it with friends, teach your kids, or savor a quiet slice alone at midnight. Pizza dough lovers know: the crust isn’t just a vehicle for toppings—it’s the soul of the pie.
Now go forth, dust your counter with flour, and make some magic. 🍕